«back
Prey Drive Promotion, Part I
Following my article in the Nov/Dec issue I was asked to continue discussing
the drives used in protection training in short articles. I will use my translation
of Helmut Raiser's book Der Schutzhund as a reference in my discussion.
Let's begin practical training for protection work where it should begin: with
prey-drive promotion. Let me briefly explain why I chose the word "promotion"
over the word "development" to translate the German term "Förderung", which could be translated either way. To me the term development refers to
a process which takes place on its own. Drives develop naturally through maturation
to a certain degree. As trainers we should try to give nature a helping hand by
promoting what is already there, and therefore actively enhance a particular drive
to its maximum potential.
I like to start prey work as early as possible with puppies, usually around ten
to twelve weeks old. This allows me to work with all the unspoiled inborn instincts
of the dog. I start young puppies the same way I start late starting adults, with
a rag or a sack. The most important thing for the helper to understand during
this early work is that the sack is the prey, not the helper. Therefore, the quick,
sporadic, and unpredictable movements of the sack are what peak the dog's interest
and consequently stimulate the dog's prey drive. As Raiser writes in his book:
"If one tries to promote prey drive, then all the dog's focus should be on the
prey, meaning it is the prey that does all the moving around, not the helper."

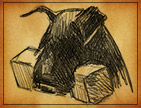
One of the reasons for starting with a sack is that it is relatively easy to shake
it and wiggle it and let it fly around, and therefore get all the dog's attention
on the sack. Another is that it is much easier to bite for beginners whether they
are puppies or late starting adults. Now that we have the basic idea of what the
crucial elements of start up work are, lets see what typical training exercise
should look like.

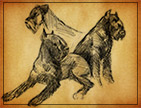
The dog is on leash, the handler encourages the dog calmly, without distracting
him from focusing on the prey. The helper makes the rag come alive by moving and
wiggling it sporadically. This moving rag triggers the dog's prey drive. The helper
will see first the dog's eyes following that little creature, then his body will
follow slightly pouncing after the elusive prey, finally the dog will start to
snap after it in an attempt to catch it and make prey. When the dog appears almost
hypnotised by the rag and the tension waiting for just the right moment is written
all over the dog's body, that is when the helper moves the rag to within the dog's
reach, and snap, the dog bites into the rag. As soon as he does the prey is his.
He wins his rag, and the handler should praise him in a proud tone (but not to
the point where the dog forgets about his prey). Initially I let the dog have
his way with his prey for a bit, but then I want to make it clear to him that
it is indeed a prize worth keeping. I use two methods to accomplish this. One,
I have a string on the rag which I keep in my hand even after the dog wins the
rag. And just when the dog starts loosing interest in the seemingly lifeless prey
and he loosens his grip or drops the rag on the ground, I revive the rag by pulling
on the string. The dog will either feel the tension in the rag and firm up his
grip, or it will slip away from him and the prey stimulation starts again. After
a couple of these "losses", or near "losses", the dog will hold on to the prey
quite firmly, not wanting to take the chance to let it slip away again. As soon
as he shows this kind of commitment the dog should be allowed to carry his prey
off the field.

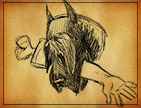
The second method I use is pretty close to what Raiser describes as "challenging"
in his book. Again this work starts after the dog has won his prey but then either
holds it loosely in his mouth or he puts it down on the ground in front of him.
This time I try to show the dog that he is not the only one interested in his
prey. The helper also has his eye on that prize, and this already describes a
large part of the exercise. The helper starts challenging the dog for the rag,
by cautiously reaching for a corner of the rag, then quickly pulling his hand
back, only to reach for it again from a different angle. If the rag is still in
the dog's mouth, a slight tug might help to make it clear to the dog that the
helper's intention is to steal his rag. A lot of dogs will at that point show
a pulling away of the prey, or a confident re-grip on the prey with a dirty look,
or a slight growl and then a re-grip on the prey. All these behaviors lead to
a confident holding of the prey, which should be rewarded by letting the dog carry
the prey off the field. In dogs with good balance in all drives both methods work
well and we should probably use both to keep the work interesting for the dog.
If prey drive is the dog's strongest motivation, then the first method will lead
to quicker results. The second method works nicely on dogs who are very possessive
and who show defense of prey behavior easily. As Raiser writes: "...the challenging
is already the first stimulation of defense behavior..."
The next step in training should be to make sure that the dog holds his prey
(the rag) hard enough on his initial bite. This is done by simply not letting
the dog win the prey on his initial snap, but instead holding on to the rag a
bit longer with a bit of tension on it. So that if the dog snaps at the rag, but
then eases his grip, he will lose the prey which should then immediately begin
to move and wiggle again. Prey drive is once again stimulated by this movement
and the dog gets another opportunity to bite the rag. The goal is not to try and
rip the prey out of the dog's mouth, but to challenge the dog enough to make him
bite progressively harder.

This work should progress to where the dog has to jump to reach the rag and make
prey. I accomplish this by simply holding the rolled-up rag high enough, at the
moment the dog gets the opportunity to bite it so the dog has to jump to reach
it. With adolescent dogs or late started adults this means chest or belly height,
with talented puppies I usually hold it just high enough to make them do a little
hop which gets their front paws off the ground. The principle is the same, jump
and bite to make prey. This is a foundation technique which a dog will use throughout
his protection work career.

The step I chose as the next training progression jumps the queue a bit in the
sequence Raiser outlines in his book. However it still follows one of his most
fundamental principles: "It is not the helper who dictates the action, but the
dog. During drive promotion work one has to accomplish that the dog stimulates
the helper, not the helper the dog." My choice as the next skill the dog should
learn is to flush the prey by barking. The previous training steps should have
created a bit of an obsession in the dog for chasing and biting the prey (rag).
As before I start by stimulating the dog's prey drive with the wiggly rag, I may
even let the dog snap at it and miss once. Then when I have the dog primed for
this activity, I create a bit of frustration by suddenly stopping all action and
movement. The helper stands still looking off into the distance, the rag hanging
in his hand lifeless. Most dogs whine just a bit, then they let out a frustration
yelp. It is this yelp which causes the rag to fly up like a bird flushed from
a bush, and the dog gets to make prey. It won't take long until these initial
yelps turn into demanding barks which sound purposeful and pushy; their goal,
to get the action started again. So, the dog learns early on that he has some
control over what happens on the field, and that barking is the way to make things
happen. The reason I incorporate this exercise this early into training is to
avoid letting the dog get so pre-occupied with biting during protection work that
nothing else matters to him any more.
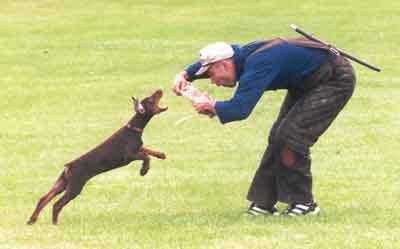
The next training stage in my program is usually the strike or attack. And once
again my program deviates slightly from Dr. Raiser's. He lists the transfer from
the rag or tug to the sleeve before the teaching of the strike. I follow the same
sequence when training talented late started adult dogs. However, when training
puppies and young dogs I like to teach an early form of the striking technique
first. When the dog has mastered the hard initial bite and the jump and bite to
make prey exercises, I start teaching the striking technique. The handler holds
the dog by the collar, the helper stimulates the dog in prey drive, first very
close to the dog, he can even let him snap and miss once. Then he distances himself
from the handler and dog, while still simulating the dog. He goes to a distance
of about three to four meters initially. He continues to wiggle the rolled up
rag or puppy tug to entice the dog. On a pre-arranged signal by the helper, the
handler releases the dog. The helper stands slightly sideways to the dog, when
the dog reaches the jumping distance, the helper pulls the rag upwards and slightly
sideways, "remember prey always moves away from the dog" (Raiser). This last second
movement should prompt the dog to pounce quickly to prevent the getaway of the
prey. The helper should gently absorb the dog's impact in the rag and set the
dog on his feet. Then the prey is released, the dog is leashed up, and the dog
gets to carry the prey off the field. I have found that puppies and young dogs
have no hang-ups about hopping up on strangers from any angle. Therefore, they
learn a nice striking technique into the helper very easily and early on. Sometimes
dogs can't bite a sleeve yet because they are too small, or because they have
to undergo defense drive promotion before they bite hard enough to handle a sleeve.
I have learned from experience that "missing the boat" when it comes to teaching
a technique when the time is right can lead to a lot of "what might have been"
discussions later on. Don't misunderstand me I do not mean to imply that I know
as much or more than Dr. Raiser, I simply have developed a preferred program sequence
over the years.
This brings me to the end of this article, since there are limits to how long
these things can go on. The follow-up article, discussing the transfer to the
sleeve, teaching the dog to fight, shifting into prey drive from the control phase,
and the pro's and con's of prey work, is already in the works. I hope to get your
attention again in the next article.